by choij | Oct 12, 2020 | Tools 101, Tutorials
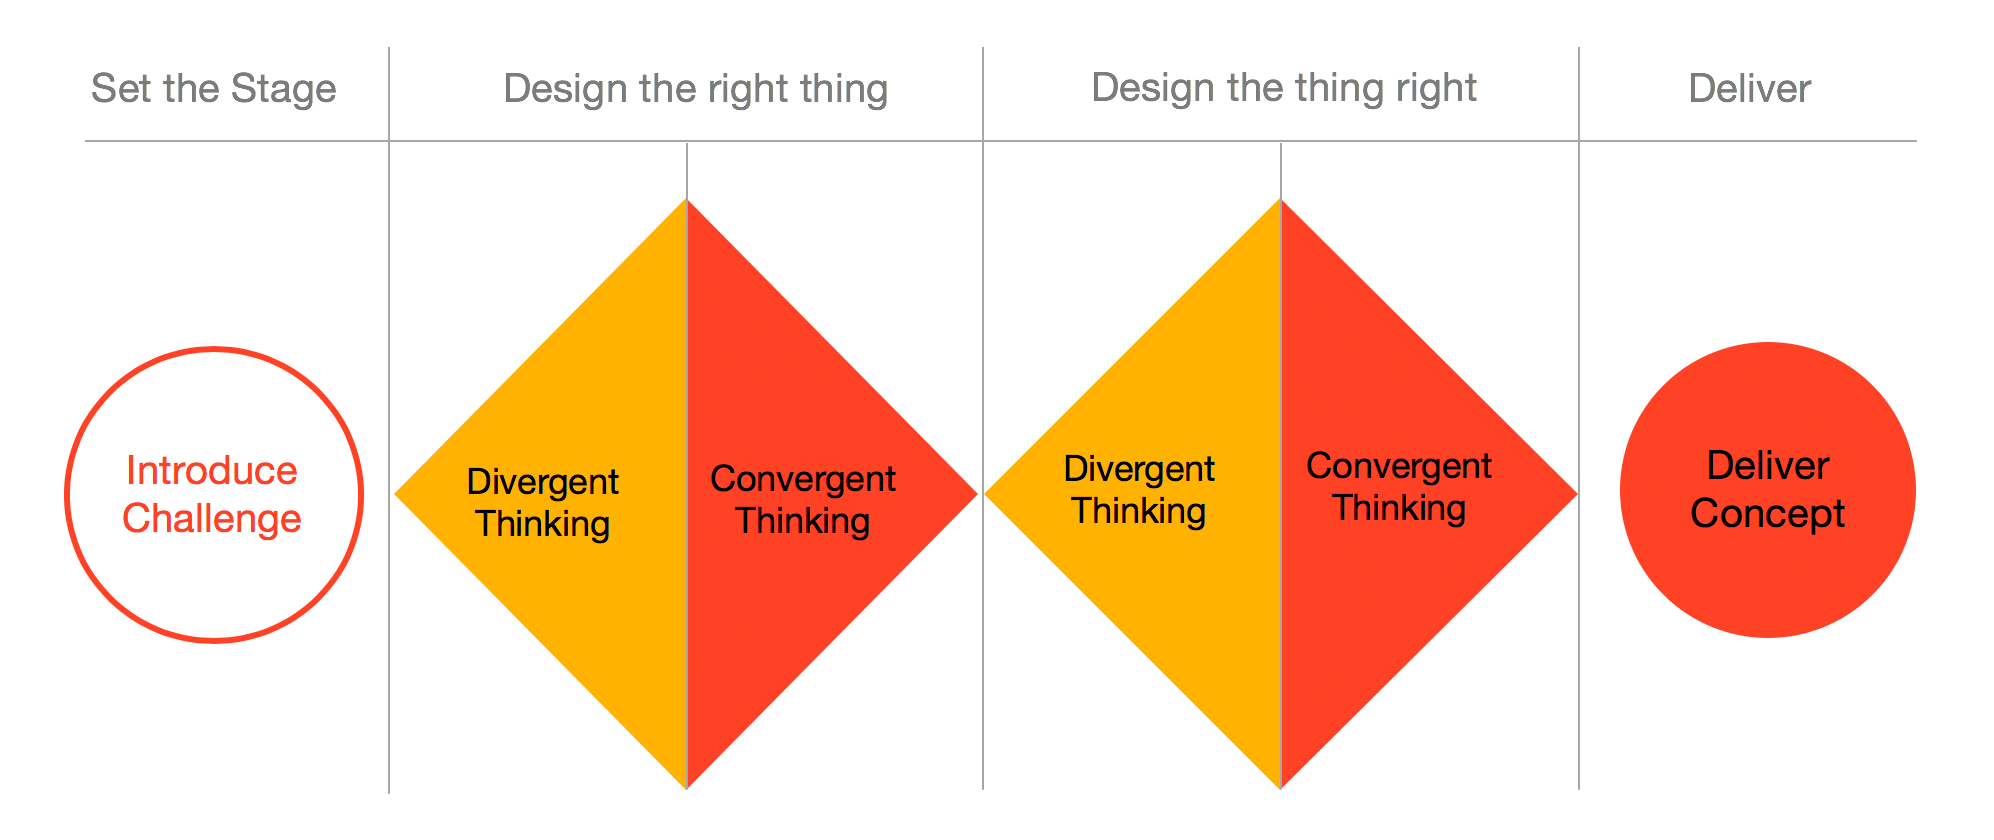
The double diamond is a well-known visual map of the design process starting with the challenge at hand and ending with a final solution. The process pairs divergent thinking (where the participants come up with many ideas) with convergent thinking (narrowing the ideas down to the most feasible and practical).
– – –
The Double Diamond is a problem-solving framework that originally began in the design world. It describes four phases of problem solving:
- Set the stage
- Design the right thing
- Design the thing right
- Deliver
The first phase is when a problem is acknowledged, and the problem-solving challenge is introduced. Phase 2 and 3 are the active portions of the problem-solving process where the solution is ideated, designed, and created. In the last phase, the solution is delivered to the user.
The diamonds represent the different types of thinking that are needed during the problem-solving process. The left-hand side of each diamond represents Divergent Thinking. This is when teams are encouraged to widen their thinking and generate a broad range of ideas. On this side of the diamond, quantity is more important than quality. Divergent thinking benefits from diversity of thought, so be sure to include new and varied team members who can help everyone think outside of the box.
ITK Tip: Check out the 4 tools in the “Generate Ideas” category of our Toolkit: Lotus Blossom, Mind Mapping, TRIZ Prism, and Bodystorming!
After a certain threshold (based on time or some other factor), the team then moves into the right-hand side of the diamond. This area represents Convergent Thinking, where the team narrows their thinking. Here, they’ll focus on reducing, prioritizing, and eliminating many options into one. The team will often use evaluation criteria to help them remove options.
ITK Tip: Check out the 3 tools in the “Evaluation Options” category of our Toolkit: Rose, Bud, Thorn; Stormdraining; and Prototyping!
You’ll notice that there is a diamond in both Phase 2 and Phase 3. That’s because this cycle of divergent and convergent thinking is an iterative process. Although the diagram doesn’t explicitly show it, you can actually repeat the diamond pattern multiple times within one phase, whether in parallel or in series!
Another thing you’ll notice is the similarity of the labels in Phase 2 and Phase 3. However, they are critically different in meaning: In Phase 2, you design the right thing, whereas in Phase 3, you design the thing right.
The key distinction here is that Phase 2’s priority is to make sure you define the problem well. A clearly articulated problem statement ensures that all teammates are on the same page and that it’s a problem worth solving. If this phase is skipped, team may find themselves creating solutions for symptoms of a problem, rather than the real problem itself.
ITK Tip: Check out the Problem Framing canvas!
Once the team gains consensus on the problem, then the team embarks into Phase 3 where they can begin creating solutions. The team again flows from divergent to convergent thinking until they arrive at a final solution. Especially in Phase 3, it’s very common to have multiple iterations of this diamond cycle.
That’s the double diamond in a nutshell, and let us know in the comments below how your team uses this framework!
by rgregorio | Sep 14, 2020 | Keeping up with the team, Tools 101
Bridging Innovation frequently partners with MITRE’s Innovation Toolkit (ITK) team – also known as “Team Toolkit” – to train our employees, government sponsors, and startups learn how to be innovative and jumpstart the innovation process. Using the user-centered methods in the ITK will help teams to ask and answer the right questions, build consensus around the problem they’re trying to solve, and design the right thing.
The ITK is a curated collection of tools to empower us to think and work more like innovators. The Toolkit is made up of 25 lightweight, low-cost, high-impact methods and templates that get everyone innovating, regardless of their domain. All tools come with a template and description of how to use it on the website. The tools are organized into use cases on the ITK website.
In July, Rachel Gregorio, from Team Toolkit, introduced the ITK to the MassChallenge Texas cohort. She provided the startups with some suggested tools that they can apply to some typical use cases, such as using Premortem to plan ahead and assess risks, Rose, Bud, Thorn to capture rapid feedback from users, and Mission Vision Canvas to define where their company is going.
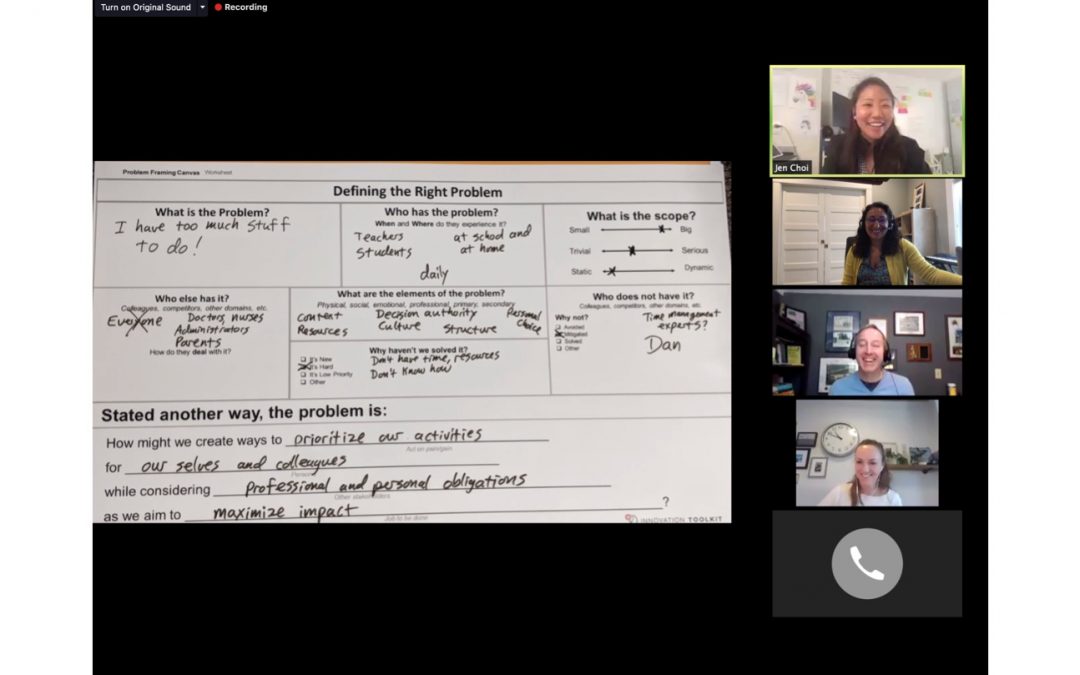
Also in July, Team Toolkit hosted a virtual Challenge Statement training for members of the Banshee program, a 2-week innovation training program run by Hanscom Air Force Base and MassChallenge for Air Force and Army acquisition programs. Using 3 tools from the ITK, Jen Choi, Rachel Gregorio, Marissa McCoy, and Dan Ward led 60 program participants through a tool chain – where the output of one tool leads to the input of the next tool – to develop challenge statements releasable and generalized for industry.
Team Toolkit started by explaining the Lotus Blossom, a divergent ideation tool, before converging around their favorite ideas using the Stormdraining tool. Next, the participants walked through the Problem Framing tool to reframe and refine their problem statement. Taking the final outputs from the tool chain, they were encouraged to further generalize the statement, line-by-line, to ensure it removed acronyms, jargon, and specificity to mission.
Participants in the Banshee program learned powerful methodologies and easy to use tools to shape their problems and solution needs in clear and concise language without being prescriptive in the implementation. This approach opens the door for finding game changing innovative solutions
If you’re interested in working with Team Toolkit, feel free to reach out to the team via our Contact form and subscribe to their newsletter to stay up-to-date on all things innovation!

by rgregorio | Jul 13, 2020 | Tools 101, Tutorials
Persona is a tool we use to describe a semi-fictional ideal customer or user of your product or service. The tool lives under “Understand User” category and serves as a vital way to understand or empathize with their perspective, opinion, or point of view.
Personas help a project team understand their users’ needs, motivations, limitations, and capabilities, acting as a focal point and reminder throughout the project, ensuring the final product is something a human being would actually need or want. Personas accelerate the process of developing and validating solutions, are a useful component of thought-experiments, and help increase the clarity and realism of the project team’s pitches and presentations.
Envisioning a persona can be challenging, especially when starting with a blank sheet of paper. What do they like? What do they do? What are their responsibilities? What are their values? Ideally, you want your personas to be built off existing user research to help answer these questions. But what if you don’t have existing users? Sometimes it’s easier and more impactful to start by outlining an anti-persona – or PersNOna – that you want to target. Identifying what falls out of scope can be just as important as identifying what falls into scope. Using reverse thinking, this exercise clarifies, refines, and builds consensus among your team.
We’re no strangers to reverse thinking or brainstorming here at Innovation Toolkit. If you’re familiar with our Premortem tool, you know that through defining failure, we inversely define success. Sometimes it’s easier to think negatively about all the things that could go wrong and where we may misstep, than what we actually need to do to succeed.
Oftentimes, thinking about the reverse can be freeing and allow ideas to flow more openly than solution-oriented brainstorming, removing the pressure to be “right” and encouraging failure. Once you’ve brainstormed all of the ideas for failure, you reverse them into solutions. Reverse brainstorming is a good technique when it is difficult to identify solutions to the problem directly. It could be used in standard solution brainstorming, too (challenge: fill out a Lotus Blossom with anti-ideas!).
You may want to create a PersNOna for several reasons:
- You think everyone could be a target user / your persona is too broad
- You don’t know where to start with a persona
- You feel strongly about the qualities that would NOT fit your target user/customer
- You want to work by process of elimination
Sometimes it’s easier to start with the “definitely nots” than the “definitely’s.” That was the case when we were discussing adding new members to Team Toolkit. We couldn’t quite put our finger on the qualities of someone we would want to join the team, but it was much easier to write down what we did NOT want. Some examples of the “thanks, but no thanks” category were ego driven, fixed mindset, did not want to collaborate or learn, and traditional/set in their ways. The team got passionate about this discussion, especially because we all agreed we wanted to maintain the cultural attributes of the team when adding training new folks.
Have you put off creating a persona or solving a problem because landing on the “right” solution felt too daunting? We encourage you to try flipping the script and flexing your reverse thinking muscles to define the “nope’s” before getting to the, “Yup, that’s it!” We all deserve to be off the hook for thinking of the “right” thing every now and then, we can finally get to a truly innovative solution – something different that makes a difference.

by dbward | May 11, 2020 | Tools 101
The newest tool in our Innovation Toolkit is the Mission & Vision Statement Canvas. This is a great tool to use when forming a new organization, or any time you need to clarify a group’s activities and purpose.
To get started, gather your team and spend a few minutes discussing the objective of the session and the difference between a Mission Statement and a Vision Statement. These terms are often used without being defined, so a brief explanation up front can help get everyone on the same page and reduce confusion. We suggest that a good VISION statement describes future conditions in aspirational terms. In contrast, a good MISSION statement describes present activities in concrete terms.
One of our favorite examples comes from the nonprofit group Feeding America. Their vision is “A Hunger Free America.” This aspirational vision describes a highly desirable future in plain language that is clear, memorable, and inspiring.
How does Feeding America pursue their vision? By executing their mission: “To feed America’s hungry through a nationwide network of member food banks and engage our country in the fight to end hunger.” This specific, concrete mission describes what this organization does – builds networks of food banks and engages people through advocacy and awareness efforts. And just like their vision statement, Feeding America’s mission is described in simple, plain language.
While mission and vision statements are often viewed as external marketing materials, they actually have a role to play internally as well. Each member of the team’s daily activities should line up with the mission. If anyone is doing things that do not match the mission, they are unlikely to contribute towards achieving the vision.
Because Mission and Vision statements get to the heart of what a team does and why they do it, it is a good idea to include team members in the process of developing them. This canvas provides an easy way to make sure everyone in your group has a voice in developing these statements.

by choij | Apr 27, 2020 | Tools 101, Tutorials
Q: Team Toolkit, you always encourage me to tailor the ITK tools for my needs. I’m in! But HOW exactly, do I do that??
A: Great question, anonymous audience member!
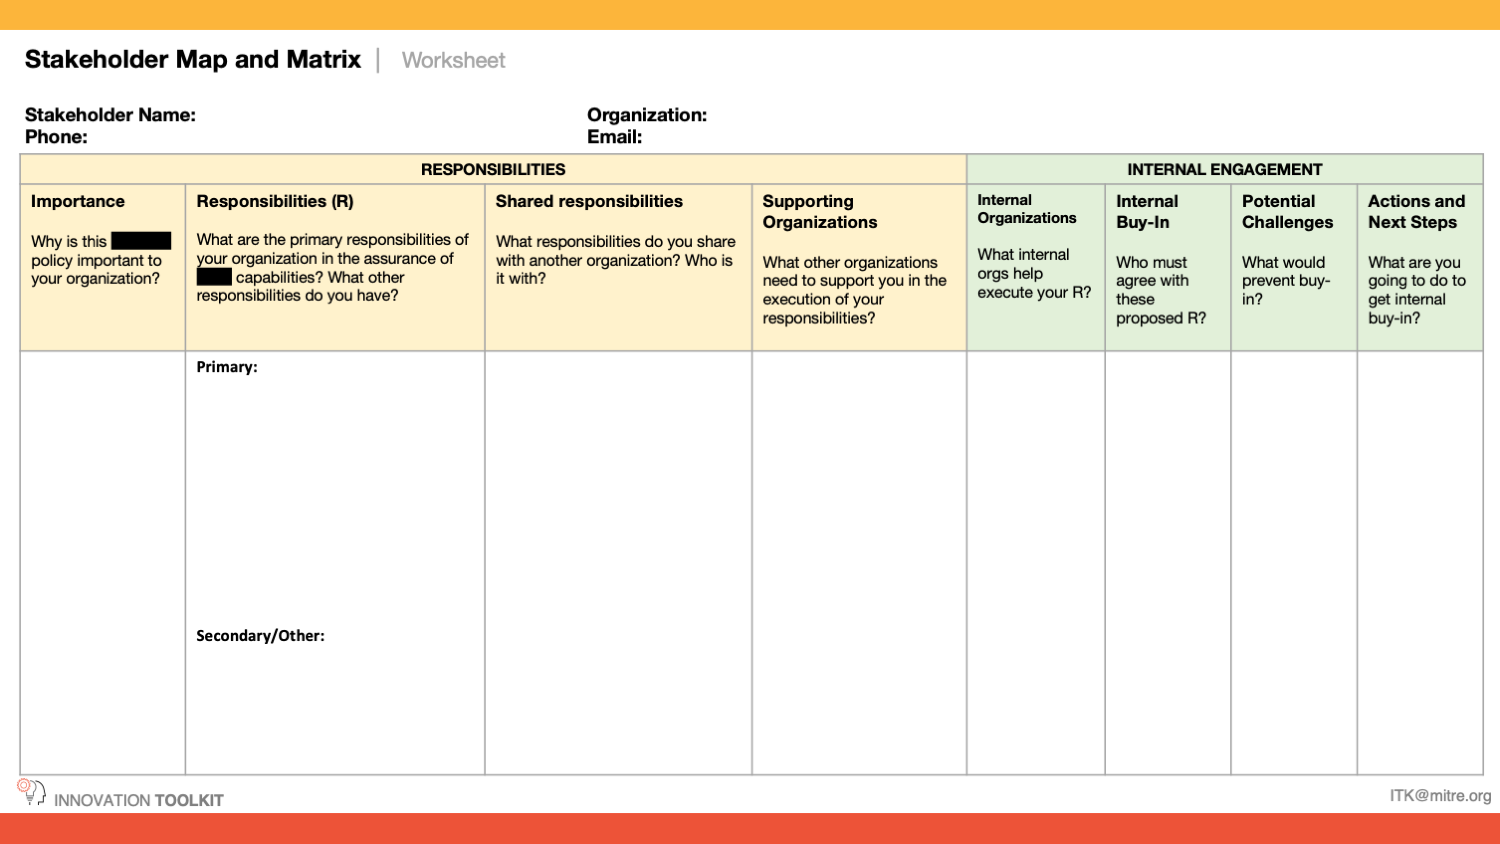
While “tailoring” inherently implies that every case is unique, here’s an example approach showing how the Stakeholder Map & Matrix was tailored.
A MITRE colleague approached Team Toolkit looking for tips & guidance for co-facilitating a kick-off meeting with senior stakeholders across the government. This group was responsible for rewriting a major policy, which included a “Responsibilities” section that identifies key players and their main responsibilities. Our colleague had only 30 minutes for this Responsibilities discussion, and she was hoping there would be an ITK tool that could help streamline the input-gathering and quickly build consensus.
Our go-to tools for discussing key stakeholders are the Community Map and Stakeholder Map & Matrix tools. However, these tools didn’t quite fit the need due to the nature of the policy rewrite task:
- The Community Map identified key players, but it was too broad because it also identified Allies and Influencers. While important, those groups would not have a direct responsibility and thus, would not be included in the policy. Since time was short, discussing key players that wouldn’t be mentioned in the policy was deemed unnecessary, and the Community Map was nixed.
- The Stakeholder Map & Matrix was helpful in narrowing the scope to focus only on those key players, and it began collecting needed information about their responsibilities via the Impact, Influence, Importance, and Contribution fields. The Stakeholder Map & Matrix was also helpful for asking the audience to plan ahead for how they can successfully engage with this key player.
- However, the task at hand required more: In this policy rewrite, it was known that some key players would have shared responsibilities, which also requires a discussion of supporting responsibilities.This required parsing the responsibility further into primary and supporting responsibilities. Similarly, the engagement approach would have to be adapted to include not just key players, but also the supporting players, some of which may be internal to their organization. The Stakeholder Map & Matrix was a good base, but it needed tailoring.
Through a series of quick-turn iterations, Team Toolkit worked together with our colleague to create a custom Stakeholder Map and Matrix.
In the end, the final tailored tool was split into the two most important areas where the MITRE team needed input and follow-up action: Responsibilities and Internal Engagement. Some fields were modified or eliminated altogether, and new fields were introduced. The use of color informed the audience which sub-categories existed, and the use of white space indicated which areas required more input (more white space = more input needed). The sub-fields included specific terms (blacked-out in the picture for sensitivity), and we intentionally used key phrases that were recognizable and understood by the audience.
Since this was a kick-off meeting for a collaborative effort, we also modified the language to be more optimistic and cooperative. For example, the titles were changed: “Block” was rephrased as “Potential Challenge”. The prompt question “How could the stakeholder block the project?” was rephrased as “Who must agree with these proposed Responsibilities? What would prevent buy-in?”
Our colleague informed us that the kick-off meeting went very well, and the tailored Stakeholder Map & Matrix was helpful to get the inputs the MITRE team needed and to streamline the Responsibilities discussion. Check out the final tailored tool below!
To summarize our approach, here are our tips for how you can tailor ITK tools:
- Get clear on what is really needed from the ITK tool, and focus on those fields
- Don’t be afraid to modify, eliminate, or introduce new fields!
- Strategically use color & white space to non-verbally guide your user
- Use specific language or terms that your audience will recognize
- Modify word choice depending on what attitudes you would like to invoke in your audience
- Try the tailored tool for yourself or with 1-2 colleagues, and keep iterating until it is simple enough to use without instructions
by rgregorio | Jan 20, 2020 | Tools 101
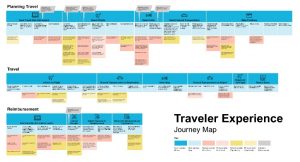
Choosing the right tool for your specific situation is an important first step, because trying to use the wrong tool can be frustrating and wastes time. One tool I find useful in a wide range of situations is the Journey Map, so this week’s blog post takes a look at what it is and how to use it.
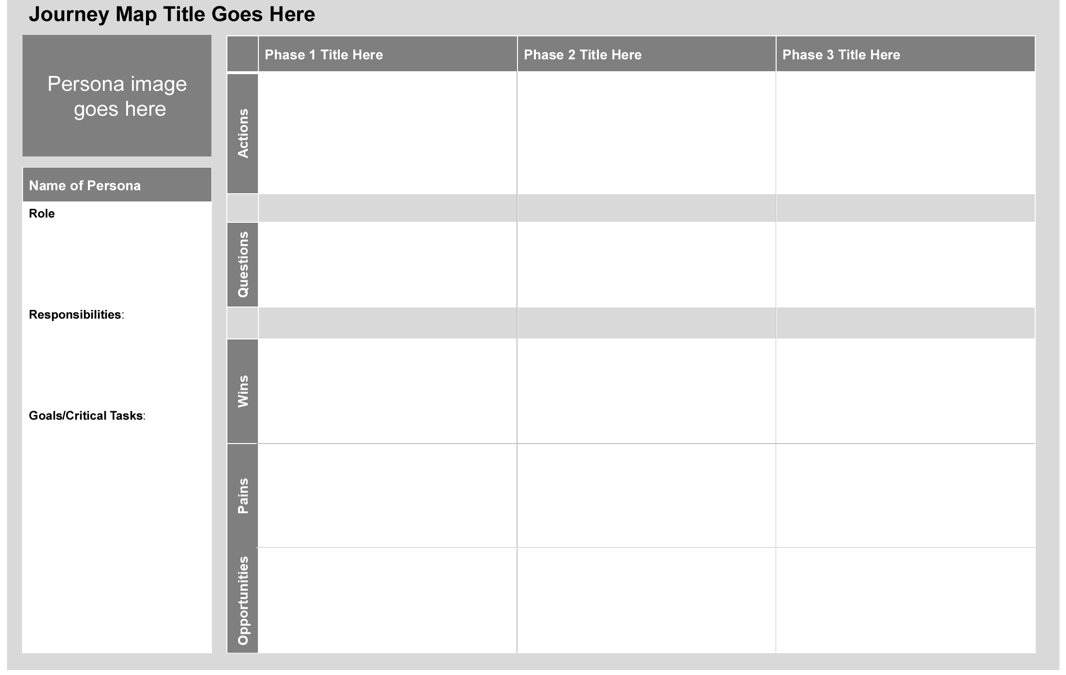
Journey maps are a quick way to learn about a process from a user’s perspective – the actions they take, the questions they ask, the good and bad elements of the journey, and the opportunities for improvement. It’s a great way to identify bottlenecks, workarounds, and wins to improve a process.
It’s called a “journey map” because it illustrates a “journey” of one persona or user through the ups and downs of their experience. We often develop an “as is” journey map before making recommendations for a “to be” journey map, identifying what needs to change from one to the other.
While the journey map has many of the same qualities our other tools have – scalable, lightweight, high impact, and fun – it has a couple of characteristics that make it my MVP in the Toolkit.
Puts you in the user’s shoes. Like many of the ITK tools, this one puts the user at the center of our process. More than other tools, though, Journey Map allows you to really walk a mile in your user’s shoes. It starts with the Persona tool to understand the user’s background, goals, roles, and responsibilities, then inserts that user into the context of a process. It expands the scope of a persona so we can see what software they use, who is on their team, the struggles they face, and what keeps them up at night.
As humans, we’re natural-born storytellers. We like a beginning, middle, and end. Viewing a journey from the user’s perspective provides that and quickly creates deep understanding.
Helps you ask the right questions. Many of the tools provide a framework for asking the uncomfortable questions or those that we’re assumed to know (“What problem are we trying to solve?”). Often, processes are seen as obvious or are based on unstated (and unexamined!) assumptions. The journey mapping script I’ve drafted (included at the end of this blog) helps you glean expertise and knowledge from users from their perspective. This script can be used with your users to build your own journey map. I encourage you to adjust the script as necessary based on what you need to capture. Following the script makes the process feel more accessible and doable, compared to starting from scratch.
A polished output builds consensus. My favorite part about the tool is the polished, visual output, which can easily be built in PowerPoint or Word, and serves as an artifact to build consensus. When moving from your interview results to the finished journey map, using action verbs and descriptive language will encourage more people to understand the user journey.
You may want to use icons to add some visual interest to more quickly communicate your ideas. The end product is organized, accessible, and looks like it took a long time to create. I find a lot of good icons at The Noun Project
To show what I mean by a polished end product with impact, here is a sample journey map we developed to map the entire MITRE Travel and Expense process (with the details deliberately fuzzed-out). This map was used to determine if a new integrated solution would alleviate some of the identified pains and take advantage of some opportunities. Each colored box indicated different aspects of the journey – steps in the process, pain points, work-arounds, etc. By depicting it visually, we could see which parts worked well and which need to be improved.
If you have any questions, don’t hesitate to reach out to our team via our Contact form!
Generic Journey Map Script
Persona Development
- What is your background in [service area]?
- What are the responsibilities of a [role] at MITRE? What are your daily goals/challenges?
AS IS Journey
- What is a typical timeline for your process from start to finish? Would you walk through the process starting with [point A to point B]?
- What is each step in the process? What does it entail? How important is it?
- Which steps in the process are most critical?
- Who is involved (in every step?) Your team? Outside your team?
- How long does each step take? How long does the overall process take?
- What tools do you use to support your steps/process? e.g. artifacts, reports, software, communication
Issues/Challenges
- How would you identify an issue in the process? How often do issues arise?
- Where are the pain points in the process?
- How soon into the process would you be aware of problems?
- Are there hand-offs/bottlenecks in your process?
Reflection
- What works well and what doesn’t in the process?
- What opportunities do you see in the process? What has potential to be better?
- Where do you see the need for improvements and how do you think these improvements will support your goals?
TO BE Journey
- What would be needed in a new process?
- How could you make a revised process more efficient?
- What will change from the “as is” process?