by dbward | Sep 27, 2021 | Facilitation Tips, Tutorials
This week’s post is by Josh LeFevre, Julie Williams Stogner
COVID-19 changed the way we all collaborate. As individuals and organizations make decisions about the future of their workplace, we are likely to see more collaboration sessions with a blend of in-person and remote participants. While Josh’s personal preference is to host workshops that are all in-person or all virtual, we’d like to share what we’ve learned from a recent hybrid workshop we led.
This should be the beginning of the conversation around how to make ITK, design or innovation style workshops most effective in the growing hybrid collaboration space.
THE CASE STUDY
In May, Julie asked Josh to develop and facilitate a workshop to help improve decision advantage for logistics teams that are stood up in times crisis . Throughout June and July, Josh and Julie worked closely with the sponsor to craft a half-day in-person workshop with a series of activities to achieve the desired outcomes.
The sponsor asked all the participants to attend in-person to elevate the level of collaboration. One week prior to the planned workshop, some participants expressed they could no longer attend in person or that they only felt comfortable attending virtually, due to COVID-19. While this abrupt change was not ideal, we quickly pivoted to run a hybrid workshop with six in-person participants and four virtual participants.
As one participant observed, the workshop turned out great “due in large part to the upfront planning and exceptional team support.”
If you are going to lead a hybrid ITK session, consider using this brief checklist:
IN A HYBRID CONTEXT
- Test all connections, tools and tool access (like MURAL) for participants, video feeds, microphones, Teams access, projectors/monitors, etc., are working properly and are in sync to ensure virtual portion of the meeting will not have technical difficulties
- Leave enough time to troubleshoot (do not wait till the day of to test)
- Ensure all materials are printed or available online ahead of time
- Have one lead facilitator and at least two – four co-facilitators (3-5 facilitators total)
- Lead facilitator should attend in person if possible
- Have at least 1-2 extra co-facilitators in-person to collect notes and update lead facilitator of incoming virtual feedback. One of these facilitators should be responsible to monitoring the online chat and video feeds in the room.
- The secondary facilitator may be needed as escort for participants depending on site guidelines
- Have at least 1-2 facilitators online to capture notes, transcribe in-person activities and manage online conversations. One of these facilitators should be confident running a virtual workshop on their own in case there are technical issues.
- Make “video on” a requirement for virtual participants (or at least when they speak and participate). Video on encourages engagement and less distraction of virtual attendees. This also helps in-person participants feel as if they are being eased dropped on.
- If using MURAL (digital whiteboard) and in-person whiteboards, make sure both are updated and match synchronously
- This can be done by either an in person or online facilitator
- This task is incredibly challenging as those attending virtually cannot always see the activity outputs until they are completed
- Encourage participants to read their contributions as they are added
- Facilitator (Lead) can re-read the up-voted contributions
- Secondary facilitator can take pictures after each activity to ensure the online participants and facilitator(s) are able to follow
- Take time to pause and invite virtual participants to contribute to discussions
- Take breaks after dot voting to tabulate online and in-person votes
- Consider utilizing an MS Form version of Rose, Bud, Thorn
- Use printed handouts and virtual handouts for attendee bios, instructions for site, instructions for activities, contact information for follow on discussions (create these ahead of time)
ADDITIONAL THINGS TO TRY
- Have a smart projector or large touchscreen up in the room for in-person and remote persons to collaborate seamlessly via a digital interface
- Provide video feeds via tablet or mobile device at every in-person working group to facilitate a stronger in-person/remote collaboration during discussions
- Pair up one in-person participant with a remote participant, throughout the workshop, to ensure the remote participant’s voice is heard and has a clear access to provide contributions to mixed (in-person and virtual) breakout groups
- Take more frequent but shorter breaks to ensure remote attendees stay connected and to sync in-person and virtual contributions, as needed
- Conduct a “how to” MURAL or platform training ahead of the hybrid workshop
by dbward | Sep 20, 2021 | Tools 101, Tutorials |
Today’s blog post is by Allison Khaw
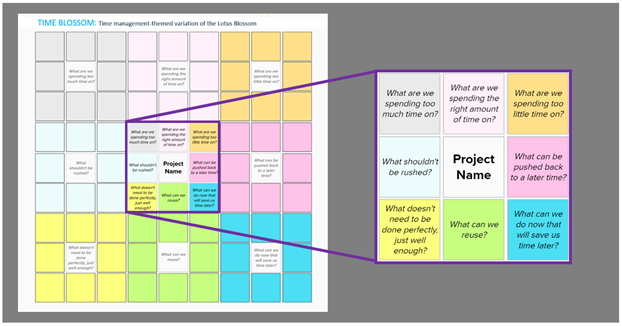
Let me tell you about the Time Blossom!
This innovation tool can be used to help you better manage your time on a project. On a larger scale, the Time Blossom is one of several existing “X-Blossoms,” which are specially-themed variations of the Lotus Blossom. Inspired by the diversity of X-Blossoms created before me, I chose time management as the underlying theme for the Time Blossom because of how pivotal a role it plays in our busy world today.
First, a refresher—to use the Lotus Blossom, start by labeling its center box with a problem or topic of your choice. From there, leverage the tool’s grid structure to brainstorm ideas and propagate them outward to the surrounding blossoms. These ideas may be characteristics, categories, or solutions related to your central topic, but the key is that you’ll generate many of them in a rapid manner.
The Time Blossom has the same structure as its parent tool, but it is pre-populated with eight open-ended questions that revolve around time management and prioritization. Thus, to use the tool, select a project or subject area to focus on, and then fill in the outer blossoms with your answers in the context of your project.
It’s as simple as that.
In particular, consider the top row of questions in the Time Blossom. Think of these as the “Goldilocks” questions, but in units of time: they ask you to identify tasks that are running “too hot,” “too cold,” or “just right.” In fact, the question, “What are we spending the right amount of time on?” was not included in an older version of the Time Blossom; only after early testing did I discover its importance. Recognizing what we’re doing right is just as valuable as recognizing what we can do better, after all!
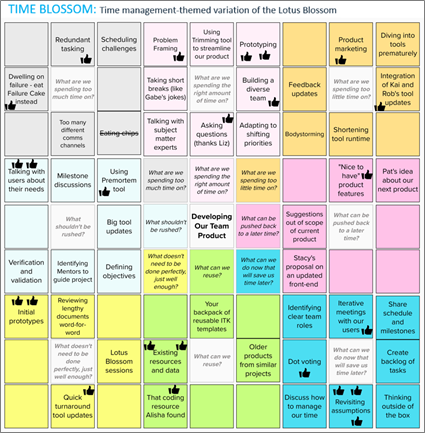
Let’s take a look at a Time Blossom example. Imagine a fictional scenario where you and your team—Alisha, Gabe, Kai, Liz, Pat, Rob, and Stacy—are holding a brainstorming session on the development of your product. (This realistic premise stems from our very own choose-your-own-adventure-style book called The Toolbox of Innovation!) If you populated the Time Blossom as shown, what might you conclude about how effectively you are managing your time?
Perhaps your team would conclude that your product development is going well but could still be improved by the reprioritization of certain tasks. For instance, you might plan to spend more time with users or set up a meeting to uncover any hidden assumptions about your product. The boxes with thumbs-up symbols indicate the ideas that especially resonated with the team. Down the line, you might even hold Lotus Blossom sessions for some of the more complex ideas that should be further explored.
To me, improving your time management skills is as much about increasing your self-awareness as it is about working efficiently. Knowing which tasks you’re prioritizing, and why, can give you a sense of clarity that is hard to find otherwise. Tools are just one way to help with that. The Time Blossom is by no means the first—nor will it be the last—time management tool, but if it prompts you to reflect on these topics, it is time well spent.
Download an editable Time Blossom template
by choij | Aug 16, 2021 | Tools 101, Tutorials
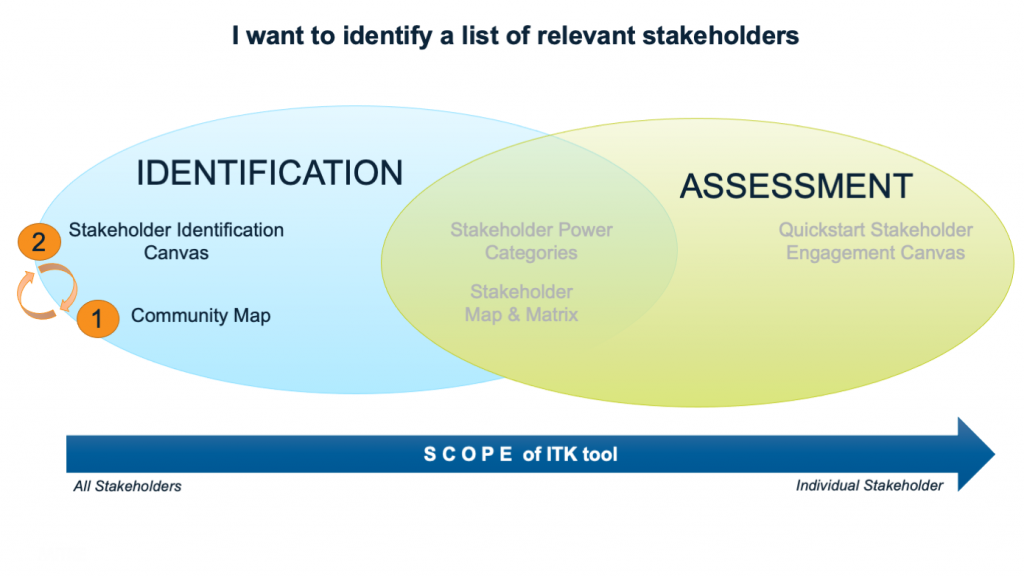
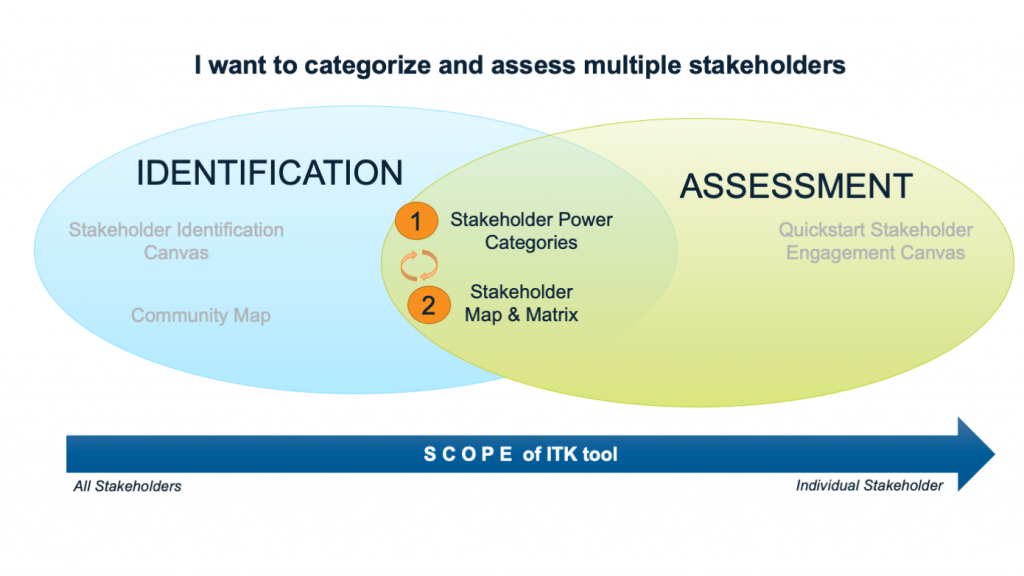
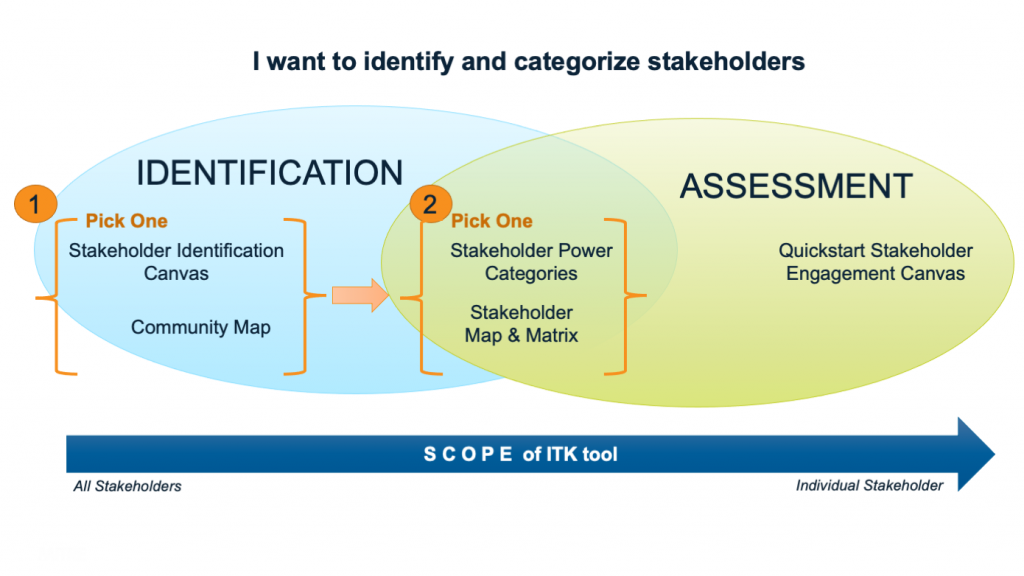
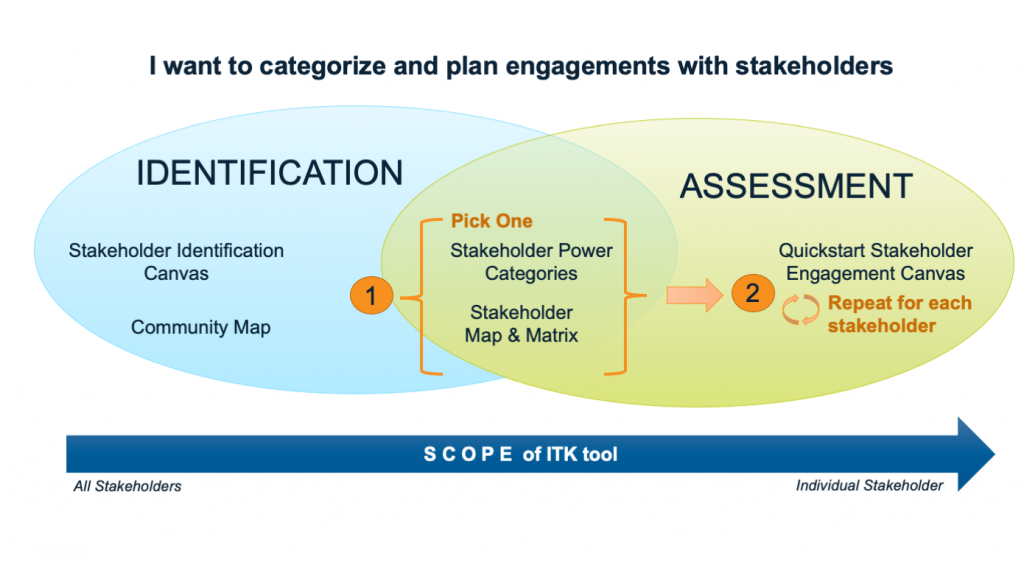
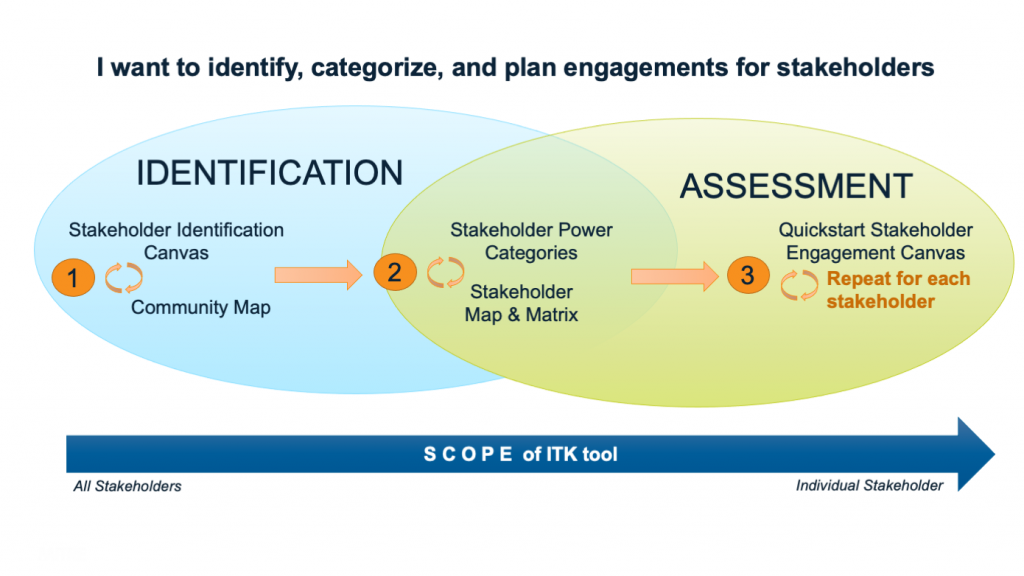
The Innovation Toolkit has 5 stakeholder-related tools, and now that you know which one to use and when, the question becomes: How can I create an ITK Stakeholder Toolchain?
As a quick refresher, Toolchains involve using a series of ITK tools in sequence, where the outputs of one tool becomes the input for the next tool. By chaining multiple tools together, you can help your team really make progress towards your intended objective.
Planning for stakeholders falls into three general steps, as listed below:
- Identifying who is a relevant stakeholder;
- Assessing which stakeholders to engage with; and
- Assessing the optimal engagement approach.
To create an ITK Stakeholder Toolchain, decide which planning steps are your objective. Next, pick & choose a tool that supports each step. If your objective is only one of the planning steps, then pick both of the tools. Voila! Now you have an ITK Stakeholder Toolchain.
Here are six example ITK Stakeholder Toolchains based on your objective:
#1 Stakeholder Toolchain: I want to identify a list of relevant stakeholders
#2 Stakeholder Toolchain: I want to categorize and assess multiple stakeholders
#3 Stakeholder Toolchain: I want to identify and categorize stakeholders
#4 Stakeholder Toolchain: I want to categorize and plan engagements for stakeholders
#5 Stakeholder Toolchain: I want to incorporate equity considerations when identifying, assessing, and planning engagements for stakeholders
#6 Stakeholder Toolchain: I want to identify, categorize, and plan engagements for stakeholders
While there are many stakeholder-related methods and tools on the market, our goal with these ITK stakeholder tools is to help teams quickly get started or unstuck when thinking through how to include relevant stakeholders for their effort. We encourage teams to use the ITK tools in combination with other market tools to create even more Stakeholder Toolchains.
Let us know how it goes in the comments below!
—
Links to ITK Stakeholder Tools:

by choij | Aug 2, 2021 | Tools 101, Tutorials, Uncategorized
Tips on selecting from the 5 different ITK stakeholder tools
– – –
Planning for stakeholders falls into three general steps:
- Identifying who is a relevant stakeholder;
- Assessing which stakeholders to engage with; and
- Assessing the optimal engagement approach.
The Innovation Toolkit now has 5 stakeholder-related tools, which serve different purposes and are complementary with each other. These tools are best used early in the effort, but they can be revisited whenever the effort needs to interact or collaborate with the people involved, interested, or impacted by the effort.
Here are some quick tips for when to use each stakeholder tool.
| ITK Tool |
What is it |
Scope of Tool |
When to use it |
Why use it |
|
Stakeholder Identification Canvas
|
Ideate a more comprehensive & representative set of relevant stakeholders to your effort |
(Ideally) All stakeholders |
Step #1 – Identifying who is a relevant stakeholder |
The embedded equity lens helps broaden the team’s perspective to consider stakeholders beyond the default set |
|
Community Map
|
A fast way to capture and prioritize stakeholders |
(Ideally) All stakeholders |
Step #1 – Identifying who is a relevant stakeholder |
Can be conducted very quickly because of the simple and intuitive categories (which can be tailored to the team’s effort) |
| Stakeholder Power Categories |
Quickly categorize and assess which stakeholders to engage |
Multiple stakeholders |
Step #2 – Assessing which stakeholders to engage with |
The embedded equity lens highlights impacted stakeholders and how to elevate their roles on the effort |
|
Stakeholder Map & Matrix
|
Look across multiple stakeholders and categorize them according to key variables (e.g., interest, influence, impact) |
Multiple stakeholders |
Step #2 – Assessing which stakeholders to engage with |
Can assess and compare multiple stakeholders at the same time |
|
Quickstart Stakeholder Engagement Canvas
|
A quick way to begin developing a plan for effectively engaging a stakeholder |
Individual stakeholder |
Step #3 – Assessing the optimal engagement approach |
The embedded equity lens helps the team explore four additional considerations beyond the default to help create more equity-informed engagements |
While there are many stakeholder-related methods and tools on the market, our goal with these ITK stakeholder tools is to help teams quickly get started or unstuck when thinking through how to include relevant stakeholders for their effort. We encourage teams to use the ITK tools in combination with other market tools to successfully identify, assess, and plan engagements with stakeholders.
Let us know how it goes in the comments below!

by dbward | Apr 12, 2021 | Tutorials
Last week we posted a video about the most frequently asked question. This week’s video addresses a question that doesn’t get asked often enough: What is innovation?
by m93718 | Nov 30, 2020 | Misc Awesomeness, Tutorials
(Today’s post is by Gabby Raymond, one of our new Team Toolkit Trainees!)
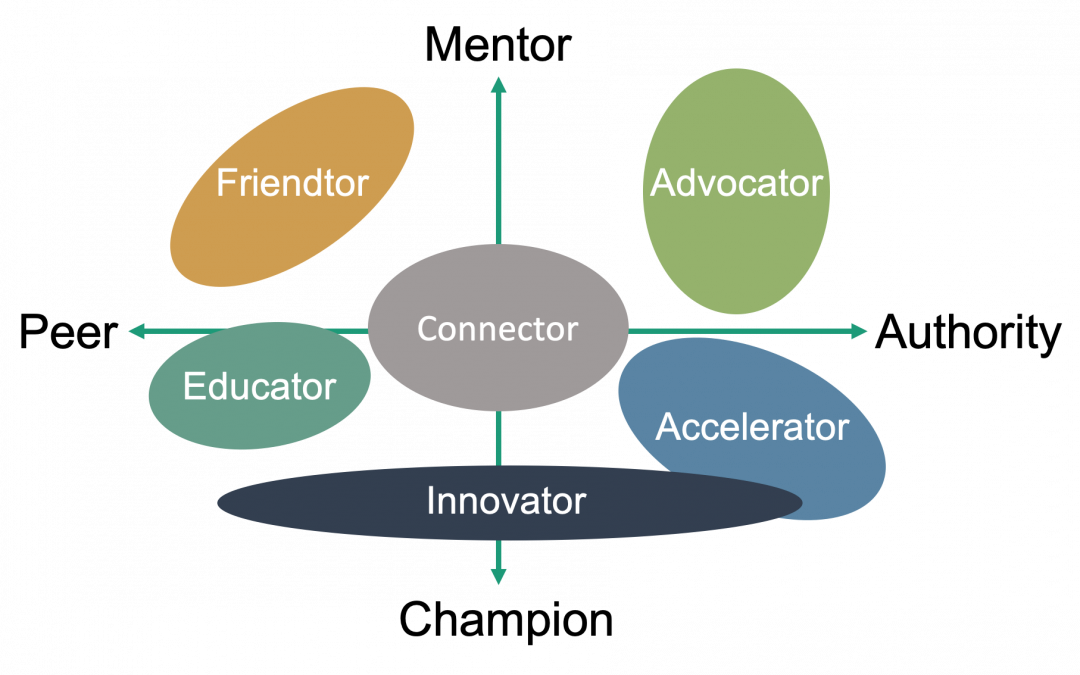
Finding a good mentor is like getting a personalized self-help book, one that is full of insightful questions and practical guidance tailored to you. A traditional mentor focuses on guiding your personal growth. However, you can receive a wide array of guidance from a variety of perspectives when you work together with someone, so let’s expand our vocabulary a bit and use the word Collaborators as a more general term.
Just like you wouldn’t need five copies of the same self-help book, it’s useful to have different types of Collaborators, each playing a different role. The alignment chart below illustrates a variety of Collaborators based on the people I have found particularly valuable in my life. The goal of this diagram is to help you identify any gaps in your current cadre and opportunities to round out your group. And the best part, meeting up with one of these Collaborators only costs about as much as a cup of coffee! (usually)
In this chart, the horizontal axis reflects the Collaborator’s relationship to you; your peers are on the left while those with more seniority, formal authority, or clout are on the right. The vertical axis depicts the Collaborator’s perspective on guidance. The guidance you get from people at the top of the vertical axis helps you with personal growth, while the guidance from people at the other end of the axis helps you solve problems or champion solutions.
When I think of a traditional mentor, I think of an Advocator in the upper right quadrant. As someone with clout who can help you grow career-wise, they’ve been in your shoes and can give you advice. Advocators also know other authority figures with whom they can share your accomplishments; they’re the Collaborator who can help you get your next promotion. I find advocating for yourself and having others advocate for you is an important way to gain visibility in your community.
In the upper left side is the Friendtor, a peer who you trust to give more personal advice. They walk the line of friend and mentor, so they know all the best things about you but can also point out your flaws. I personally ask my Friendtors for advice on team dynamics and navigating conversations with my leadership.
An Educator straddles the line in the lower left quadrant. They are someone with specific domain knowledge about the problem you’re trying to solve. An Educator’s role is to teach you skills or information relevant to your work and are the Collaborator you’re most likely to shadow. I’ve found Educators to be closer to a peer than an authority figure, but that’s not always the case.
An Innovator is a Collaborator who is a problem-solving powerhouse, and they span the whole bottom half of the chart. Innovators can either have a background in your problem area or can be someone with a fresh perspective – both mentalities can be incredibly useful depending on your situation. People who embody the mindset of Team Toolkit are my go-to Innovators.
Solidly in the lower right Authority/Champion quadrant is the Accelerator – think of them as someone who will help catapult your idea. They’ve got high-powered connections and stay up to date with the current trends. The strategic prowess of an Accelerator means they are the ones who can help develop and refine your idea. These Collaborators are moving quickly from success to success and can help you do the same.
Finally, at the center of this chart is a person with a wide network, the Connector. They’re the Collaborator who seems to know everyone. Having a Connector introduce you to someone they know personally is often more successful than cold-emailing someone with whom you want to grab a virtual coffee. They can be your gateway to many of the other Collaborators in this chart.
I hope this post has helped you view mentors through a new frame of reference. If you have any questions, feel free to reach out and grab a virtual cup of coffee (or tea!) with me.