by dbward | Aug 1, 2022 | Tools 101, Tutorials
The TRIZ Prism is a terrific, powerful tool that helps users develop innovative solutions to really hard problems. If you find yourself facing a difficult problem with no clear, obvious solution, this is the tool for you. Here’s a short summary of how the tool works:
Start with a specific problem statement (you may want to use the Problem Framing Canvas first). Then convert that specific problem into a generalized / abstracted problem statement. Once you have a generalized problem, make a list of general solutions to that category of problem. Finally, use those generalized solutions as a basis for creating a specific solution to your specific problem.
The video below provides a more detailed walk-through.
And if you’d like to learn more about TRIZ (aka The Theory of Inventive Problem Solving), check out this Wikiwand article, which is chock full of details.

by choij | May 2, 2022 | Facilitation Tips, Tools 101
Similar to the timekeeper, using a “Parking Lot” is an excellent strategy for helping teams stay focused and on track during an ITK session.
The Parking Lot is a blank space where you can capture “good, but off-topic” inputs that can be returned to later in time so that the team can stay focused on the main topic or goal.
In a collaborative session, it’s common that some input may be brought up too early and needs to be returned to after the current session. Or, adjacent topics may arise which also warrant discussion but doing so immediately would be distracting to the current session’s objective.
There are many reasons why a parking lot can be useful:
- Helps teams stay focused on the main topic at hand
- Recording input makes it easier to remember and revisit in the future as needed
- Allows recording of all input, even if off-topic, which enables teammates to feel heard
Interested in trying it out? Try these steps below!
Steps:
- Before your session, create a Parking lot
- For in-person sessions: Set up a blank easel and label it “Parking Lot”
- For virtual sessions: Create a designed blank space in your virtual whiteboard and label it “Parking Lot”
- At the beginning of the session, announce what the Parking Lot is and state that anyone can contribute to it
- Throughout the session, collect and record input to the Parking Lot
- As time allows, return to the Parking Lot to review and address remaining issues or ideas not already discussed in the remaining time
- Assign an owner to relevant issues or ideas who will be responsible to bring it to resolution
Photo Credit: Angele Kamp
by dbward | Sep 20, 2021 | Tools 101, Tutorials |
Today’s blog post is by Allison Khaw
Let me tell you about the Time Blossom!
This innovation tool can be used to help you better manage your time on a project. On a larger scale, the Time Blossom is one of several existing “X-Blossoms,” which are specially-themed variations of the Lotus Blossom. Inspired by the diversity of X-Blossoms created before me, I chose time management as the underlying theme for the Time Blossom because of how pivotal a role it plays in our busy world today.
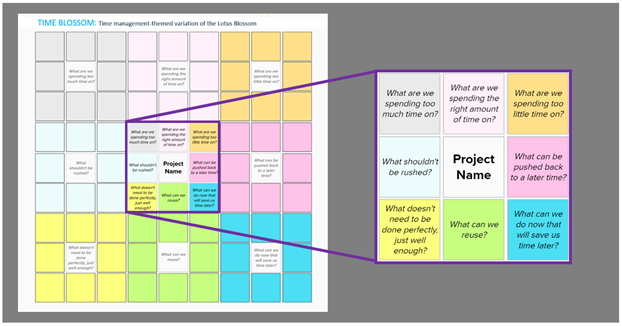
First, a refresher—to use the Lotus Blossom, start by labeling its center box with a problem or topic of your choice. From there, leverage the tool’s grid structure to brainstorm ideas and propagate them outward to the surrounding blossoms. These ideas may be characteristics, categories, or solutions related to your central topic, but the key is that you’ll generate many of them in a rapid manner.
The Time Blossom has the same structure as its parent tool, but it is pre-populated with eight open-ended questions that revolve around time management and prioritization. Thus, to use the tool, select a project or subject area to focus on, and then fill in the outer blossoms with your answers in the context of your project.
It’s as simple as that.
In particular, consider the top row of questions in the Time Blossom. Think of these as the “Goldilocks” questions, but in units of time: they ask you to identify tasks that are running “too hot,” “too cold,” or “just right.” In fact, the question, “What are we spending the right amount of time on?” was not included in an older version of the Time Blossom; only after early testing did I discover its importance. Recognizing what we’re doing right is just as valuable as recognizing what we can do better, after all!
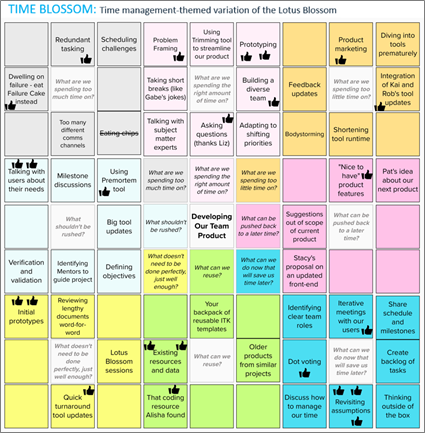
Let’s take a look at a Time Blossom example. Imagine a fictional scenario where you and your team—Alisha, Gabe, Kai, Liz, Pat, Rob, and Stacy—are holding a brainstorming session on the development of your product. (This realistic premise stems from our very own choose-your-own-adventure-style book called The Toolbox of Innovation!) If you populated the Time Blossom as shown, what might you conclude about how effectively you are managing your time?
Perhaps your team would conclude that your product development is going well but could still be improved by the reprioritization of certain tasks. For instance, you might plan to spend more time with users or set up a meeting to uncover any hidden assumptions about your product. The boxes with thumbs-up symbols indicate the ideas that especially resonated with the team. Down the line, you might even hold Lotus Blossom sessions for some of the more complex ideas that should be further explored.
To me, improving your time management skills is as much about increasing your self-awareness as it is about working efficiently. Knowing which tasks you’re prioritizing, and why, can give you a sense of clarity that is hard to find otherwise. Tools are just one way to help with that. The Time Blossom is by no means the first—nor will it be the last—time management tool, but if it prompts you to reflect on these topics, it is time well spent.
Download an editable Time Blossom template
by choij | Aug 16, 2021 | Tools 101, Tutorials
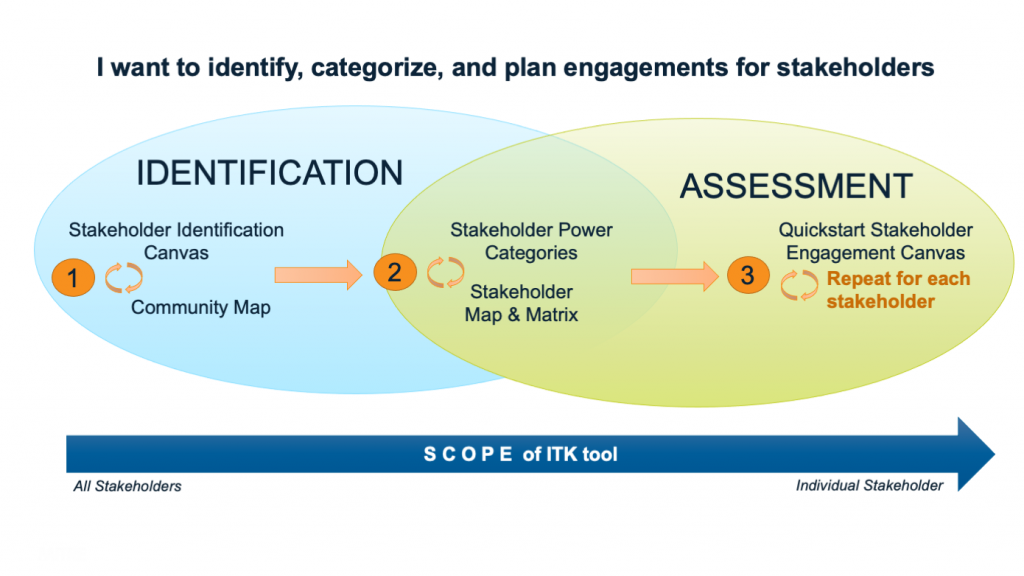
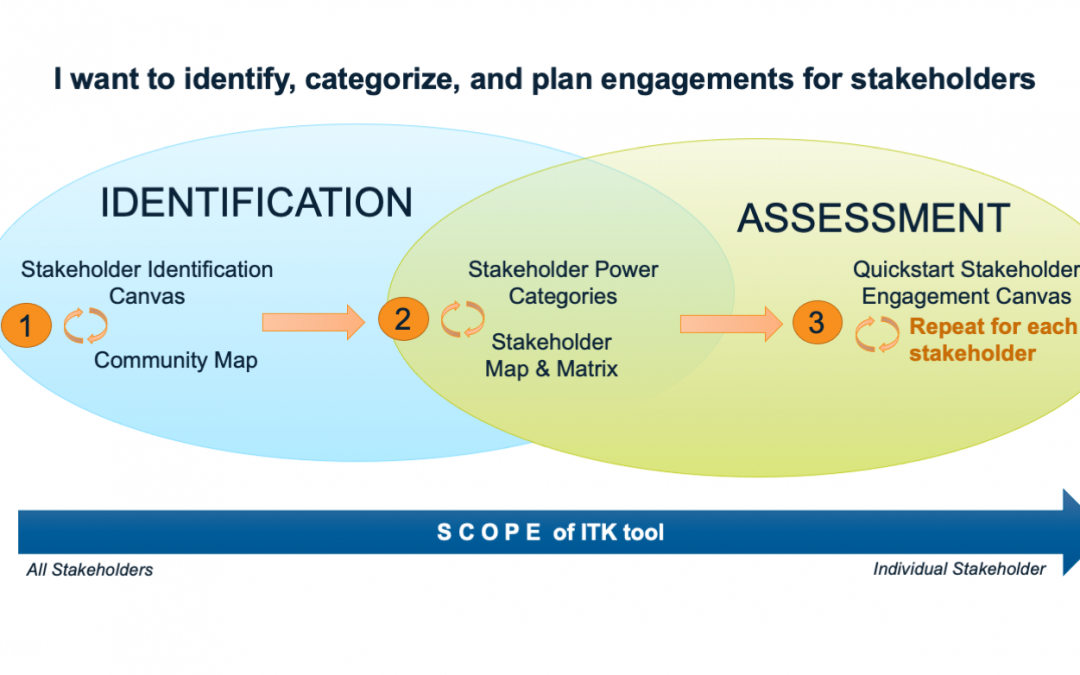
The Innovation Toolkit has 5 stakeholder-related tools, and now that you know which one to use and when, the question becomes: How can I create an ITK Stakeholder Toolchain?
As a quick refresher, Toolchains involve using a series of ITK tools in sequence, where the outputs of one tool becomes the input for the next tool. By chaining multiple tools together, you can help your team really make progress towards your intended objective.
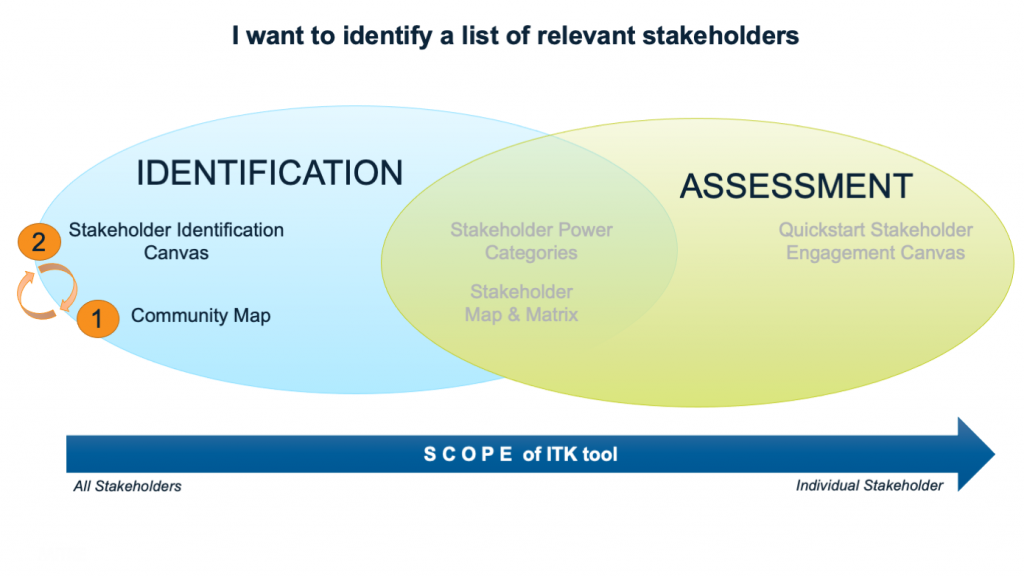
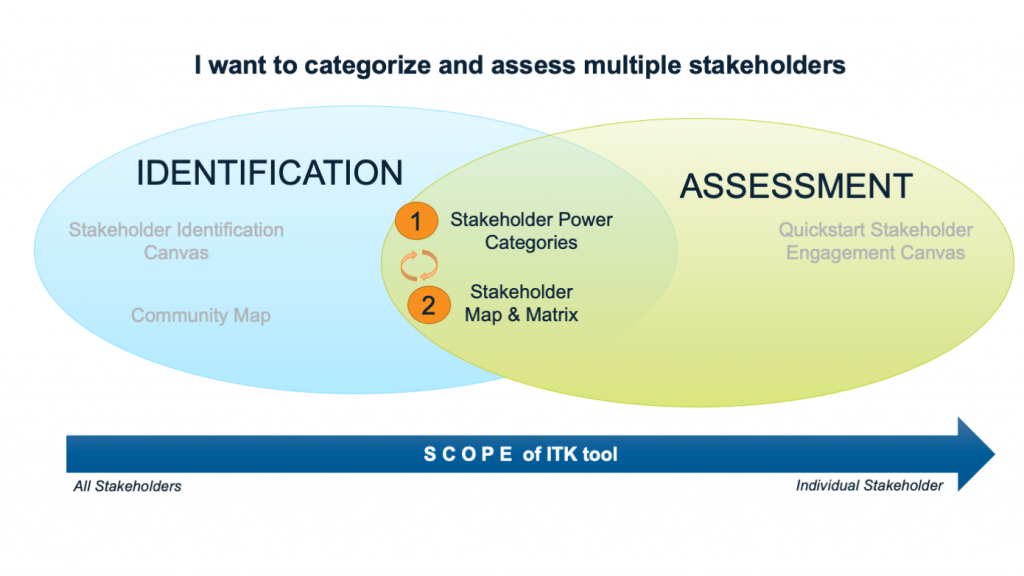
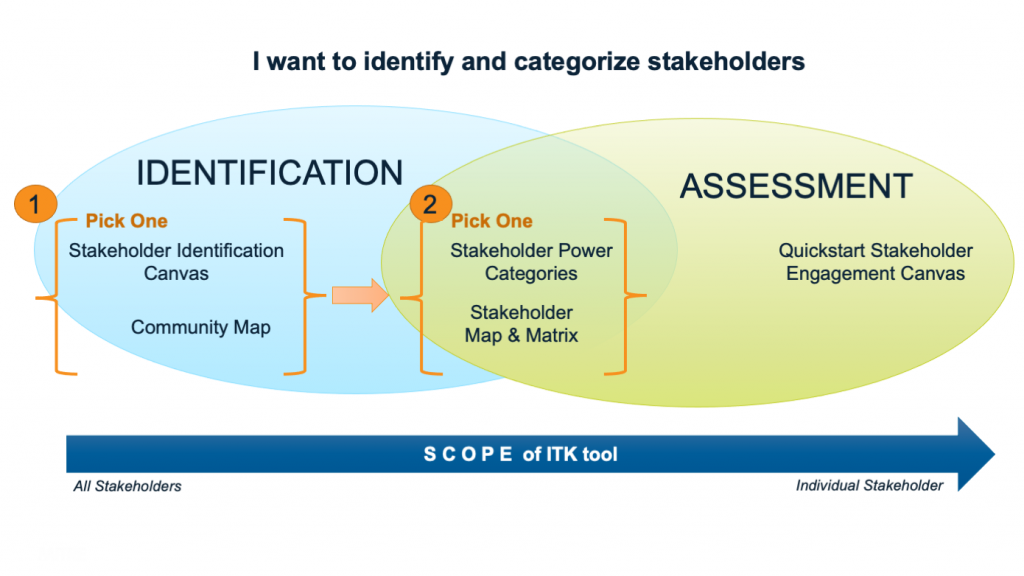
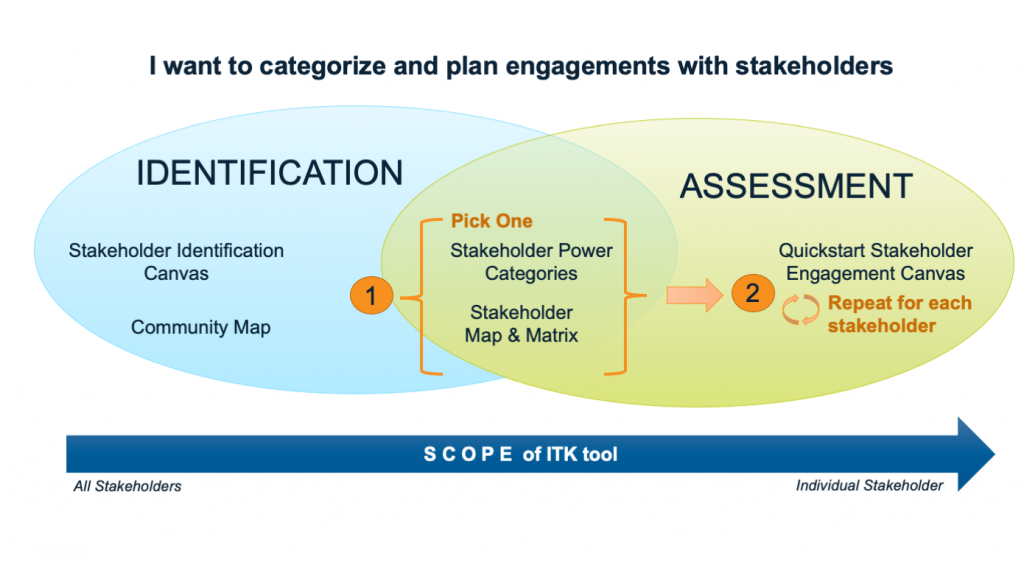
Planning for stakeholders falls into three general steps, as listed below:
- Identifying who is a relevant stakeholder;
- Assessing which stakeholders to engage with; and
- Assessing the optimal engagement approach.
To create an ITK Stakeholder Toolchain, decide which planning steps are your objective. Next, pick & choose a tool that supports each step. If your objective is only one of the planning steps, then pick both of the tools. Voila! Now you have an ITK Stakeholder Toolchain.
Here are six example ITK Stakeholder Toolchains based on your objective:
#1 Stakeholder Toolchain: I want to identify a list of relevant stakeholders
#2 Stakeholder Toolchain: I want to categorize and assess multiple stakeholders
#3 Stakeholder Toolchain: I want to identify and categorize stakeholders
#4 Stakeholder Toolchain: I want to categorize and plan engagements for stakeholders
#5 Stakeholder Toolchain: I want to incorporate equity considerations when identifying, assessing, and planning engagements for stakeholders
#6 Stakeholder Toolchain: I want to identify, categorize, and plan engagements for stakeholders
While there are many stakeholder-related methods and tools on the market, our goal with these ITK stakeholder tools is to help teams quickly get started or unstuck when thinking through how to include relevant stakeholders for their effort. We encourage teams to use the ITK tools in combination with other market tools to create even more Stakeholder Toolchains.
Let us know how it goes in the comments below!
—
Links to ITK Stakeholder Tools:

by choij | Aug 2, 2021 | Tools 101, Tutorials, Uncategorized
Tips on selecting from the 5 different ITK stakeholder tools
– – –
Planning for stakeholders falls into three general steps:
- Identifying who is a relevant stakeholder;
- Assessing which stakeholders to engage with; and
- Assessing the optimal engagement approach.
The Innovation Toolkit now has 5 stakeholder-related tools, which serve different purposes and are complementary with each other. These tools are best used early in the effort, but they can be revisited whenever the effort needs to interact or collaborate with the people involved, interested, or impacted by the effort.
Here are some quick tips for when to use each stakeholder tool.
| ITK Tool |
What is it |
Scope of Tool |
When to use it |
Why use it |
|
Stakeholder Identification Canvas
|
Ideate a more comprehensive & representative set of relevant stakeholders to your effort |
(Ideally) All stakeholders |
Step #1 – Identifying who is a relevant stakeholder |
The embedded equity lens helps broaden the team’s perspective to consider stakeholders beyond the default set |
|
Community Map
|
A fast way to capture and prioritize stakeholders |
(Ideally) All stakeholders |
Step #1 – Identifying who is a relevant stakeholder |
Can be conducted very quickly because of the simple and intuitive categories (which can be tailored to the team’s effort) |
| Stakeholder Power Categories |
Quickly categorize and assess which stakeholders to engage |
Multiple stakeholders |
Step #2 – Assessing which stakeholders to engage with |
The embedded equity lens highlights impacted stakeholders and how to elevate their roles on the effort |
|
Stakeholder Map & Matrix
|
Look across multiple stakeholders and categorize them according to key variables (e.g., interest, influence, impact) |
Multiple stakeholders |
Step #2 – Assessing which stakeholders to engage with |
Can assess and compare multiple stakeholders at the same time |
|
Quickstart Stakeholder Engagement Canvas
|
A quick way to begin developing a plan for effectively engaging a stakeholder |
Individual stakeholder |
Step #3 – Assessing the optimal engagement approach |
The embedded equity lens helps the team explore four additional considerations beyond the default to help create more equity-informed engagements |
While there are many stakeholder-related methods and tools on the market, our goal with these ITK stakeholder tools is to help teams quickly get started or unstuck when thinking through how to include relevant stakeholders for their effort. We encourage teams to use the ITK tools in combination with other market tools to successfully identify, assess, and plan engagements with stakeholders.
Let us know how it goes in the comments below!
by dbward | May 17, 2021 | Tools 101
As MITRE’s Innovation Toolkit continues to evolve and mature, we’ve been reflecting on how we create new tools (and update existing tools). The short version is we do it iteratively. For the longer version… read on!
Most of the tools you see on our website are actually version 7 or version 15 or version 382. The point is pretty much all of them went through considerable modifications on their way to the version you see on the website.
Except maybe the Lotus Blossom. Pretty sure that one popped up fully formed, like Athena from the head of Zeus.
Aside from that single exception, all the other tools are the result of an ongoing series of prototypes and experiments. Sometimes we’ve even used one tool to develop another tool… then updated the first tool based on our experience developing the second one. It gets pretty meta around here sometimes. While that may sound a bit convoluted, we actually have a pretty straightforward way of describing the tool development process. It’s built around a theater / tv show metaphor, and it goes something like this:
An idea for a new tool starts in the Café, where one or two people begin sketching out a rough idea and produce an initial incomplete draft. Maybe they have a casual chat with someone at the next table over, or maybe they have their headphones on as they draw and sketch and write. In Broadway terms, this is where Lin-Manuel composes that first rap and starts laying out the overall structure of Hamilton.

Alexander Hamilton
Next, we move to the Writer’s Room. This is where a group gathers to co-create the tool and further develop it from the Café version. They play with phrases and formats, identify and address gaps in the tool. The idea is for the initial instigator to bring in some collaborators who help transform the incomplete idea into the first complete draft. In the world of musical theater, this might be where a lyricist brings in a composer (or vice versa), or a writer brings in a co-author.
Next is a special type of casual rehearsal called a Table Read, where we test a basic version of the tool with people who weren’t involved in creating it. The point here is to invite new perspectives & contributors. To use Hamilton terms again, this is where Leslie Odom Jr shows up and the writers get to see how the lines actually sound when the actor says them (and continue to rewrite the lines based on that observation & discussion).
Eventually we get to the Dress Rehearsal, where a complete version of the tool is used in a closed environment, to really put it through its paces… without an audience. Unlike the table read, in our dress rehearsal our focus goes beyond the tool itself and now includes facilitation techniques and logistics. In our theater metaphor, this is where the script is basically locked down and the director confirms the lighting, blocking, and choreography.
Then we come to Opening Night, the first time the tool is used with an external group, sponsor, etc. This is still an opportunity to test & evaluate & modify the tool, so we’re all watching and taking notes about changes to make in the next version.
The Full Run means the tool is field-tested, polished, and proven. We might make some small tweaks at this point, adjust the choreography slightly or make little tweaks to the dialogue, but by now the thing is pretty much solid & we can do 8 shows a week. As an added bonus, the understudies get opportunities step on stage… and the writer goes back to the café.
As you see, like a Broadway show, developing a new ITK tool is generally an iterative, collaborative process. One person can instigate and take a certain degree of ownership for a tool, one person can shepherd it through the whole process, pick co-authors and hold own auditions, etc. But nobody has to write / produce / sing / dance / etc in a one-person performance. There are plenty of people available to lend a hand and help transform the spark of an idea into a big hit…